Nota
O acesso a esta página requer autorização. Podes tentar iniciar sessão ou mudar de diretório.
O acesso a esta página requer autorização. Podes tentar mudar de diretório.
Copy data to Azure Data Box Heavy
Important
O Azure Data Box agora dá suporte à atribuição de camada de acesso no nível de blob. As etapas contidas neste tutorial refletem o processo de cópia de dados atualizado e são específicas para bloquear blobs.
As informações contidas nesta seção aplicam-se a pedidos feitos após 1º de abril de 2024.
Este tutorial descreve como conectar e copiar dados do computador host usando a interface web local.
Neste tutorial, você aprenderá a:
- Connect to Data Box Heavy
- Copiar dados para o Data Box Heavy
You can copy data from your source server to your Data Box via SMB, NFS, REST, data copy service or to managed disks.
In each case, make sure that the share names, folder names, and data size follow guidelines described in the Azure Storage and Data Box Heavy service limits.
Pré-requisitos
Antes de começar, certifique-se de que:
- You complete the Tutorial: Set up Azure Data Box Heavy.
- You receive your Data Box Heavy and that the order status in the portal is Delivered.
- You have a host computer that has the data that you want to copy over to Data Box Heavy. O seu computador anfitrião deve:
- Executar um sistema operativo suportado.
- Estar ligado a uma rede de alta velocidade. For fastest copy speeds, two 40-GbE connections (one per node) can be utilized in parallel. Se não tiver uma ligação de 40 GbE disponível, recomendamos que tenha pelo menos duas ligações de 10 GbE (uma por nó).
Connect to Data Box Heavy shares
Based on the storage account selected, Data Box Heavy creates up to:
- Três partilhas para cada conta de armazenamento associada nas versões GPv1 e GPv2.
- Uma quota para armazenamento premium.
- Uma partilha para uma conta de armazenamento de blobs, contendo um diretório para cada uma das quatro camadas de acesso.
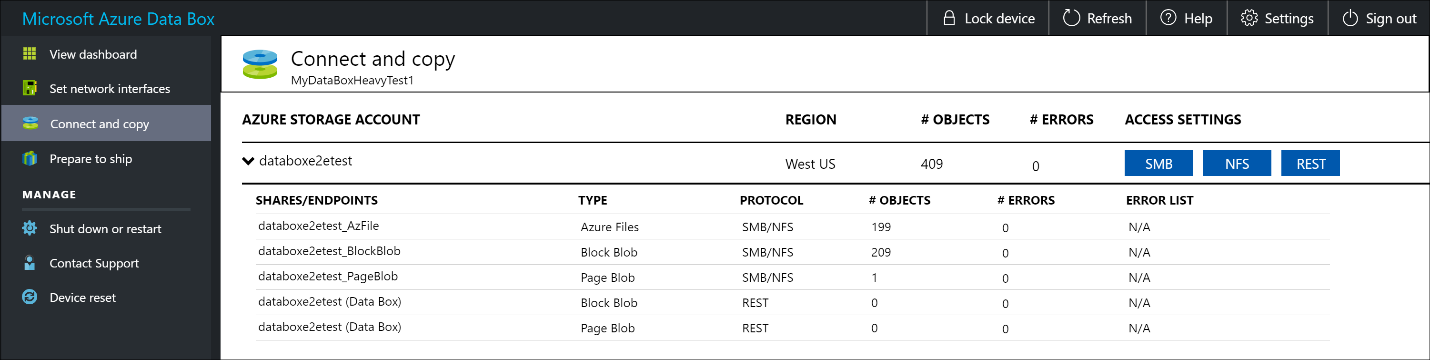
A tabela a seguir identifica os nomes dos compartilhamentos do Data Box aos quais você pode se conectar e o tipo de dados carregados na sua conta de armazenamento de destino. Ele também identifica a hierarquia de compartilhamentos e diretórios para os quais você copia seus dados de origem.
| Tipo de armazenamento | Share name | Entidade de primeiro nível | Entidade de segundo nível | Entidade de terceiro nível |
|---|---|---|---|---|
| Block blob | <storageAccountName>_BlockBlob | <\nívelDeAcesso> | <\nome_do_contêiner> | <\blockBlob> |
| Page blob | <\storageAccountName>_PageBlob | <\nome_do_contêiner> | <\pageBlob> | |
| Armazenamento de ficheiros | <\storageAccountName>_AzFile | <\nome_da_partilha_de_ficheiro> | <\file> |
Não é possível copiar arquivos diretamente para a pasta raiz de qualquer compartilhamento do Data Box. Em vez disso, crie pastas dentro do compartilhamento Data Box, dependendo do seu caso de uso.
Os blobs de bloco suportam a atribuição de camadas de acesso no nível do arquivo. When copying files to the block blob share, the recommended best-practice is to add new subfolders within the appropriate access tier. Depois de criar novas subpastas, continue adicionando arquivos a cada subpasta, conforme apropriado.
A new container is created for any folder residing at the root of the block blob share. Any file within that folder is copied to the storage account's default access tier as a block blob.
Para obter mais informações sobre camadas de acesso de blobs, consulte Camadas de acesso para dados de blobs. For more detailed information about access tier best practices, see Best practices for using blob access tiers.
A tabela a seguir mostra o caminho UNC para as partilhas no seu Data Box e a URL correspondente do caminho de Armazenamento do Azure para onde os dados são carregados. The final Azure Storage path URL can be derived from the UNC share path.
| Tipos de Armazenamento do Azure | Data Box shares |
|---|---|
| Azure Block blobs | \\<DeviceIPAddress>\<storageaccountname_BlockBlob>\<accessTier>\<ContainerName>\myBlob.txthttps://<storageaccountname>.blob.core.windows.net/<ContainerName>/myBlob.txt |
| Blobs de páginas do Azure | \\<DeviceIPAddress>\<storageaccountname_PageBlob>\<ContainerName>\myBlob.vhdhttps://<storageaccountname>.blob.core.windows.net/<ContainerName>/myBlob.vhd |
| Arquivos do Azure | \\<DeviceIPAddress>\<storageaccountname_AzFile>\<ShareName>\myFile.txthttps://<storageaccountname>.file.core.windows.net/<ShareName>/myFile.txt |
Para obter mais informações sobre camadas de acesso de blobs, consulte Camadas de acesso para dados de blobs. For more detailed information about access tier best practices, see Best practices for using blob access tiers.
The steps to connect using a Windows or a Linux client are different.
Observação
Follow the same steps to connect to both the nodes of the device in parallel.
Connect on a Windows system
If using a Windows Server host computer, follow these steps to connect to the Data Box Heavy.
O primeiro passo é autenticar e iniciar uma sessão. Vá para Conectar e copiar. Click Get credentials to get the access credentials for the shares associated with your storage account.

Na caixa de diálogo Aceder à partilha e copiar os dados, copie o Nome de utilizador e a Palavra-passe correspondentes à partilha. Clique em OK.

To access the shares associated with your storage account (databoxe2etest in the following example) from your host computer, open a command window. Na linha de comandos, escreva:
net use \\<IP address of the device>\<share name> /u:<user name for the share>Consoante o seu formato de dados, os caminhos de partilha são os seguintes:
- Azure Block blob -
\\10.100.10.100\databoxe2etest_BlockBlob - Blob de páginas do Azure –
\\10.100.10.100\databoxe2etest_PageBlob - Ficheiros do Azure –
\\10.100.10.100\databoxe2etest_AzFile
- Azure Block blob -
Introduza a palavra-passe da partilha quando lhe for pedido. The following sample can be used to connect to BlockBlob share on the Data Box having in IP address of 10.100.10.100.
net use \\10.100.10.100\databoxe2etest_BlockBlob /u:databoxe2etest
Enter the password for 'databoxe2etest' to connect to '10.100.10.100':
The command completed successfully.
Pressione Windows + R. Na janela Executar, especifique o
\\<device IP address>. Clique em OK para abrir o Explorador de Ficheiros.
Agora deve conseguir ver as partilhas como pastas. Note that in this example the BlockBlob share is being used. Accordingly, the four folders representing the four available access tiers are present. These folders are not available in other shares.

Crie sempre uma pasta para os ficheiros que pretende copiar na partilha e, em seguida, copie os ficheiros para essa pasta. You cannot copy files directly to the root folder in the storage account. Any folders created under the PageBlob share represents containers into which data is uploaded as blobs. Similarly, any sub-folders created within the folders representing access tiers in the BlockBlob share also represents a blob storage container. Folders created within the AzFile share represent file shares.
Folders created at the root of the BlockBlob share will be created as blob containers. The access tier of these container will be inherited from the storage account.
Connect on a Linux system
Se estiver a utilizar um cliente Linux, utilize o comando a seguir para montar a partilha SMB.
sudo mount -t nfs -o vers=2.1 10.126.76.172:/databoxe2etest_BlockBlob /home/databoxubuntuhost/databox
The vers parameter is the version of SMB that your Linux host supports. Plug in the appropriate version in the above command.
For versions of SMB that the Data Box Heavy supports, see Supported file systems for Linux clients.
Copiar dados para o Data Box Heavy
Once you're connected to the Data Box Heavy shares, the next step is to copy data.
Copy considerations
Antes de começar a cópia de dados, reveja as seguintes considerações:
Make sure that you copy the data to shares that correspond to the appropriate data format. For instance, copy the block blob data to the share for block blobs. Copy the VHDs to page blob.
If the data format doesn't match the appropriate share type, then at a later step, the data upload to Azure will fail.
While copying data, make sure that the data size conforms to the size limits described in the Azure storage and Data Box Heavy limits.
If data, which is being uploaded by Data Box Heavy, is concurrently uploaded by other applications outside of Data Box Heavy, then this could result in upload job failures and data corruption.
We recommend that:
- You don't use both SMB and NFS at the same time.
- Copy the same data to same end destination on Azure.
Nestes casos, não é possível determinar o resultado final.
Always create a folder for the files that you intend to copy under the share and then copy the files to that folder. The folder created under block blob and page blob shares represents a container to which the data is uploaded as blobs. Não pode copiar ficheiros diretamente para a pasta raiz na conta de armazenamento.
After you've connected to the SMB share, begin data copy.
You can use any SMB compatible file copy tool such as Robocopy to copy your data. É possível iniciar várias tarefas de cópia com Robocopy. Use o seguinte comando:
robocopy <Source> <Target> * /e /r:3 /w:60 /is /nfl /ndl /np /MT:32 or 64 /fft /Log+:<LogFile>Os atributos são descritos na tabela seguinte.
Atributo Descrição /e Copies subdirectories including empty directories. /r: Especifica o número de repetições nas cópias falhadas. /w: Especifica o tempo de espera entre as repetições, em segundos. /is Inclui os mesmos ficheiros. /nfl Especifica que os nomes de ficheiro não estão registados. /ndl Especifica que os nomes de diretório não estão registados. /np Specifies that the progress of the copying operation (the number of files or directories copied so far) will not be displayed. A apresentação do progresso reduz significativamente o desempenho. /MT Utilize multithreading (são recomendados 32 ou 64 threads). Esta opção não é utilizada com ficheiros encriptados. You may need to separate encrypted and unencrypted files. However, single threaded copy significantly lowers the performance. /fft Use to reduce the time stamp granularity for any file system. /b Copia os ficheiros no modo de Cópia de Segurança. /z Copies files in Restart mode, use this if the environment is unstable. This option reduces throughput due to additional logging. /zb Uses Restart mode. Se o acesso for negado, esta opção utiliza o modo de Cópia de Segurança. This option reduces throughput due to checkpointing. /efsraw Copia todos os ficheiros encriptados no modo EFS não processado. Utilize apenas com ficheiros encriptados. log+:<LogFile> Anexa a saída ao ficheiro de registo existente. The following sample shows the output of the robocopy command to copy files to the Data Box Heavy.
C:\Users>Robocopy C:\Git\azure-docs-pr\contributor-guide \\10.100.10.100\devicemanagertest1_AzFile\templates /MT:24
-------------------------------------------------------------------------------
    ROBOCOPY     ::     Robust File Copy for Windows
-------------------------------------------------------------------------------
    Started : Thursday, April 4, 2019 2:34:58 PM
    Source : C:\Git\azure-docs-pr\contributor-guide\
    Dest : \\10.100.10.100\devicemanagertest1_AzFile\templates\
    Files : *.*
    Options : *.* /DCOPY:DA /COPY:DAT /MT:24 /R:5 /W:60
------------------------------------------------------------------------------

100%        New File                 206        C:\Git\azure-docs-pr\contributor-guide\article-metadata.md
100%        New File                 209        C:\Git\azure-docs-pr\contributor-guide\content-channel-guidance.md
100%        New File                 732        C:\Git\azure-docs-pr\contributor-guide\contributor-guide-index.md
100%        New File                 199        C:\Git\azure-docs-pr\contributor-guide\contributor-guide-pr-criteria.md
            New File                 178        C:\Git\azure-docs-pr\contributor-guide\contributor-guide-pull-request-co100%  .md
            New File                 250        C:\Git\azure-docs-pr\contributor-guide\contributor-guide-pull-request-et100%  e.md
100%        New File                 174        C:\Git\azure-docs-pr\contributor-guide\create-images-markdown.md
100%        New File                 197        C:\Git\azure-docs-pr\contributor-guide\create-links-markdown.md
100%        New File                 184        C:\Git\azure-docs-pr\contributor-guide\create-tables-markdown.md
100%        New File                 208        C:\Git\azure-docs-pr\contributor-guide\custom-markdown-extensions.md
100%        New File                 210        C:\Git\azure-docs-pr\contributor-guide\file-names-and-locations.md
100%        New File                 234        C:\Git\azure-docs-pr\contributor-guide\git-commands-for-master.md
100%        New File                 186        C:\Git\azure-docs-pr\contributor-guide\release-branches.md
100%        New File                 240        C:\Git\azure-docs-pr\contributor-guide\retire-or-rename-an-article.md
100%        New File                 215        C:\Git\azure-docs-pr\contributor-guide\style-and-voice.md
100%        New File                 212        C:\Git\azure-docs-pr\contributor-guide\syntax-highlighting-markdown.md
100%        New File                 207        C:\Git\azure-docs-pr\contributor-guide\tools-and-setup.md
------------------------------------------------------------------------------

                Total    Copied   Skipped  Mismatch    FAILED    Extras
    Dirs :         1         1         1         0         0         0
    Files :        17        17         0         0         0         0
    Bytes :     3.9 k     3.9 k         0         0         0         0
C:\Users>
Para otimizar o desempenho, utilize os seguintes parâmetros do Robocopy ao copiar os dados. (The numbers below represent the best case scenarios.)
Plataforma Principalmente arquivos < pequenos 512 KB Principalmente ficheiros médios de 512 KB a 1 MB Principalmente arquivos com tamanho superior a > 1 MB Data Box Heavy 6 Robocopy sessions
24 threads per sessions6 Robocopy sessions
16 threads per sessions6 Robocopy sessions
16 threads per sessionsPara obter mais informações sobre o comando do Robocopy, aceda a Robocopy e alguns exemplos.
Open the target folder to view and verify the copied files.

As the data is copied:
- The file names, sizes, and format are validated to ensure those meet the Azure object and storage limits as well as Azure file and container naming conventions.
- To ensure data integrity, checksum is also computed inline.
If you have any errors during the copy process, download the error files for troubleshooting. Select the arrow icon to download the error files.

For more information, see View error logs during data copy to Data Box Heavy. For a detailed list of errors during data copy, see Troubleshoot Data Box Heavy issues.
Open the error file in Notepad. The following error file indicates that the data is not aligned correctly.

For a page blob, the data needs to be 512 bytes aligned. After this data is removed, the error resolves as shown in the following screenshot.
After the copy is complete, go to View Dashboard page. Verify the used space and the free space on your device.

Repeat the above steps to copy data on to the second node of the device.
Próximos passos
Neste tutorial, ficou a conhecer tópicos do Azure Data Box Heavy, como:
- Connect to Data Box Heavy
- Copiar dados para o Data Box Heavy
Advance to the next tutorial to learn how to ship your Data Box Heavy back to Microsoft.
Copy data via SMB
If using a Windows host, use the following command to connect to the SMB shares:
\\<IP address of your device>\ShareNameTo get the share access credentials, go to the Connect & copy page in the local web UI of the Data Box.
Use an SMB compatible file copy tool such as Robocopy to copy data to shares.
For step-by-step instructions, go to Tutorial: Copy data to Azure Data Box via SMB.
Copy data via NFS
If using an NFS host, use the following command to mount the NFS shares:
sudo mount <Data Box device IP>:/<NFS share on Data Box device> <Path to the folder on local Linux computer>To get the share access credentials, go to the Connect & copy page in the local web UI of the Data Box Heavy.
Use
cporrsynccommand to copy your data.Repeat these steps to connect and copy data to the second node of your Data Box Heavy.
For step-by-step instructions, go to Tutorial: Copy data to Azure Data Box via NFS.
Copy data via REST
- To copy data using Data Box Blob storage via REST APIs, you can connect over http or https.
- To copy data to Data Box Blob storage, you can use AzCopy.
- Repeat these steps to connect and copy data to the second node of your Data Box Heavy.
For step-by-step instructions, go to Tutorial: Copy data to Azure Data Box Blob storage via REST APIs.
Copy data via data copy service
- To copy data by using the data copy service, you need to create a job. In the local web UI of your Data Box Heavy, go to Manage > Copy data > Create.
- Fill out the parameters and create a job.
- Repeat these steps to connect and copy data to the second node of your Data Box Heavy.
For step-by-step instructions, go to Tutorial: Use the data copy service to copy data into Azure Data Box Heavy.
Copy data to managed disks
- When ordering the Data Box Heavy device, you should have selected managed disks as your storage destination.
- You can connect to Data Box Heavy via SMB or NFS shares.
- You can then copy data via SMB or NFS tools.
- Repeat these steps to connect and copy data to the second node of your Data Box Heavy.
For step-by-step instructions, go to Tutorial: Use Data Box Heavy to import data as managed disks in Azure.